Fast Talk Labs’ Strength Training Series: Week 1

In Week 1 of our Strength Training Series, we guide you through a routine that includes deadlifts, back squats, rows, and side planks.

Functional strength training is important for all endurance athletes, regardless of their chosen sport, experience, or goals. In Week 1 of our six-week functional strength training program, coach and physiologist Ryan Kohler guides you through four key exercises.

Before getting started, be sure to warm up well with our Warm-up & Activation Routine.

Kohler said: “Week 1 of this functional strength training program starts with some of my favorite fundamental movements to develop strength and athletic movement patterns. The deadlift and squat motions are a foundation from which power can be produced and sustained safely over time. It cannot be overstated enough that these two motions should not be rushed. If you have not trained these movements before, carry these out for at least four to six weeks until you feel like you’ve started to master them. Your form will change when you add weight or progress to more difficult movements, so be certain you have a solid foundation from which to start.”

The deadlift is a key “hip hinging” movement that drives power from the lower body, and your basic back squat generates power through involvement of every lower body muscle. Both movements, when done correctly, can transfer your power production over to other sports, really enhancing your functional strength. The accessory exercises included are great for developing additional core stability and upper body strength and limb segmentation.

Week 1 workout at a glance

Deadlift: 3-4 sets of 8-10 repetitions

Back Squat: 3-4 sets of 8-10 repetitions

Rows: 2-3 sets of 8-10 repetitions

Side Plank: 2-3 sets of 30-60 seconds per side

Progressions and regressions

Deadlift

To regress your deadlift, put the barbell down and pick up a set of dumbbells or kettlebells, or grab an exercise band so you can safely practice the movements before moving back to a larger or standard bar.

Back Squat

Similar to the deadlift, let’s put the bar down and work on the fundamental movements safely by utilizing dumbbells, kettlebells, or bands. You can tuck an exercise band under your feet and get into the same position to promote the same focus on quality movement and good form.

Rows

If you lack access to a bench for the “bent over” version, simply grab an exercise band and wrap it around something stable so you can do a standing or seated version. You can progress these by moving to single-leg rows or involving some unstable surfaces.

Side Plank

By going to your knees, you’re reducing the lever arm and shortening the distance between your elbow and feet, so this will be a much more manageable position from which to start. You can also make adjustments to the time. If it’s hard to hold a full side plank for 30 seconds initially, start with 2-3 sets of 10-15 seconds and build up from there.

To progress the side plank, you can elevate your top foot a few inches off the ground and then flex your bottom knee and hip. You can also add hip raises where you slowly lower the hips toward the ground (without touching!) and then raise them laterally back up into position. Finally, another advanced progression would include hip abduction with the top leg, sometimes called a “starfish.”

Pitfalls and warnings

Deadlift

  • Leaning too far back (i.e., shoulders are in line with or behind the wrists): This will cause you to start pulling back versus driving the feet straight down and could put undue strain on the back.
  • Not creating tension in the body and bar before lifting: This can lead to undue strain on the back and other joints. Work to gently “take up” slack in the bar before you begin the movement of driving your legs down to lift the weight. This can be felt by keeping the chest in a ‘high’ or ‘elevated’ position. Otherwise, you might hear that audible “click” of the bar connecting with the weight right after you start the movement and that can lead to more of a pulling up with the upper body versus driving down with the legs.
  • Allowing the bar to travel too far from the shins: Up or down, you should allow the bar path to travel essentially right against the shins when below the knees. Anything other than this may encourage you to start pulling or controlling the weight with the upper body, losing your strong core and back posture, risking injury.
  • Poor foot position: Before starting your lift, check to be sure your feet are in the right place by viewing the barbell from above. It should be running across, roughly, the middle of your feet, roughly hip-width apart.
  • Poor grip: Check your hand position. For this lift, aim to get your hands positioned just outside of the hips. They should not be too wide or too short. Together, your proper foot position will work in a complementary manner with hand position to get the body in a strong, safe posture and make this a functional strength move.
  • Not maintaining a neutral spine: If you notice your back is rounded, fix it by imagining a string attached to the very top of your head. Someone is pulling on that string—allow it to happen and feel yourself lengthen through the spine. There is a happy medium here in your posture, so take a video of yourself or have a friend watch to make sure you’re not hunching over or straining too far to maintain a neutral spine.

Back Squat

  • Moving the knees before the hips: Be careful to move the hips back first. Many people, when not paying attention to their form or just learning, tend to squat by bending the knees first. Avoid this mistake by trying to sit back in a chair that’s just out of reach. This will encourage you to drive your hips back behind the heels to start the movement and will put you into a good squatting position that’ll help your functional strength.
  • Looking up while squatting: Similar to above, while we should encourage a tall, athletic posture while avoiding the trap of hyperextending our neck while descending in the squat. Instead, give your chin a little tuck and get comfortable gazing slightly below the horizon as you squat.
  • Foot position: This isn’t really a pitfall as much as it is a personal preference. Some athletes like a wider stance, and some like a narrower stance. If you aren’t sure where to start, step away from the weight and do a jump in place. Note where your feet land and use that as a starting place for your foot position.
  • Moving up with your butt first: After reaching the bottom of your squat, drive from the hips and keep the movement happening from the bottom up. If you find yourself struggling and lifting the hips first, that’s a sign you should reduce the weight and focus on form.
  • Knees collapsing inward: The body moves strongly when bones and joints are aligned, so when it comes to moving a weight up and down, watch your knees. If they dive in as you descend, or if you have difficulty controlling them from diving in, reassess the amount of weight you’re lifting or get additional help from a Strength Coach or Physical Therapist to optimize your motion and muscle recruitment.

Rows

  • Not controlling the hips or weight.:When starting this movement, it’s easy to let the body flop around as you get into a rhythm using momentum to get the weight up and down. First, tighten your core and focus on establishing a table-like position so you can segment the arm movement.
  • Stay low! (if you can). Be sure to stay bent over if you’re doing the bent over version of this exercise. This will maximize your range of motion. Otherwise, if you find yourself gradually getting more upright with each repetition, that will encourage you to take on more weight since you’re not moving the weight as far with each rep. Instead, go back to the focus on form. Once you can complete the number of reps and sets with perfect form, then move onto more weight.
  • Too much weight: Extend your volume lifted with good form first. This is an exercise that can easily trap (pun intended) you into lifting too much weight. Instead of jumping on the weight train, work on your range of motion and allow your scapula (shoulder blade) to move all the way forward on the way down (protraction) and all the way back (retraction) on the way up. This will help to ensure you’re hitting all the major muscles this exercise should work.

Side Plank

  • Dropping hips: If you find that you have trouble holding a straight line, go from your feet to your knees to reduce the weight being held up. Over time you will be able to get into that strong plank position.
  • Flexing the neck: Once you’re in position, it’s tempting to take a look down at the perfect plank you just scored! Avoid this temptation. Instead, give your chin a little tuck, keep your gaze forward and imagine someone drawing a straight line from the ears, right through the hips, knees, and ankles. Hold that strong position.
  • Pushing the butt back: This sometimes goes along with our admiration of our perfect form. As you pitch the neck forward, or as you start to get fatigued, it’s easy to “break” at the hips and allow the butt to push backward. Pay attention to this and keep that nice straight line in mind the whole time. Focus on your breathing to take your mind off any shaking muscles as you extend your duration.

Video Transcript

Ryan Kohler  00:04

Here in week one, we’re going to start off with four really classical foundational type movements. We have a deadlift, a squat, a row, and a plank. We’ll hit total body with a good focus on the lower body. If you haven’t been doing much lifting in recent weeks or months, be sure to start off on the lighter side. Again, with that focus on form being the key aspect, choose form over weight whenever necessary. Also, I’ll provide some different tips where you can make the exercise easier, where you can regress it or we can progress it to make it a little bit harder. So with that, let’s go off and start our deadlift.

How to properly deadlift

Ryan Kohler  00:49

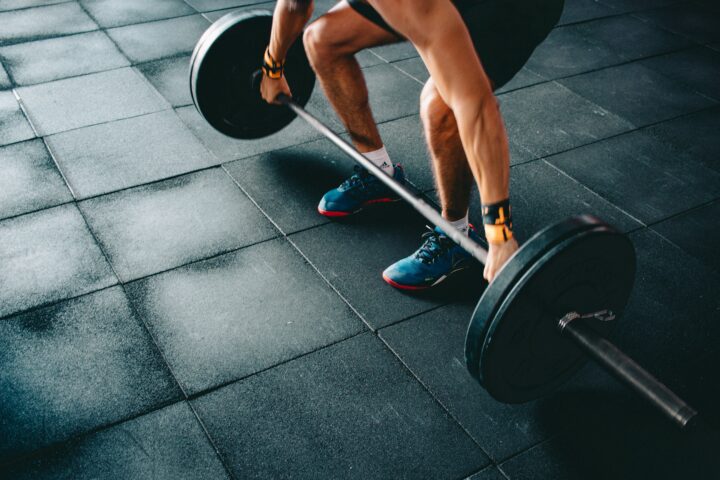
For this week, our deadlift is going to entail three to four sets of eight to 10 reps with a weight that you can lift easily with good form. So let’s get started.

What we’ll do is address the bar with our feet about hip width apart, we’ll take our hands and put those into position, just outside of our feet. From there, we’re gonna bring our shoulders down and back and create a nice neutral spine here. When you do that, you may feel the bar click a little bit as you create that tension. From that position, you’re going to drive the feet hard into the ground, and slide that barbell up over the legs. Then once it gets above the knees, we bring the hips forward to finish that lift. Now to return, we hinge at the hips, let that bar slide back down the legs. Once it’s below the knees, we bend our knees and return down to the floor.

Three red flags to watch out for when doing deadlifts

Ryan Kohler  01:35

There are a few red flags that you’ll want to watch for as you’re doing this exercise, as it’s a compound lift involving a lot of coordinated motions, be careful of at least these three things:

Not having a neutral spine

As we go down here, and we start to move, one red flag that we want to watch for is not having a neutral spine. If you find yourself doing this, and then trying to pull from there, that’s not a safe position to start in. Be sure you create that tension, draw yourself into that neutral spine, and let those shoulders get drawn down and back.

Not being close enough to the bar

The second one is the only to be not being close enough to the bar. If you’re sitting way back here, and then you start pulling the bar this way, that’s a lot of undue tension on the back. You want to let that bar come in tight, and really allow it to slide on the legs with the movement.

Drive from the ground up

The last one is going to be if you’re starting here, a good position, don’t start the movement by raising up the hips first. Drive the knee, drive the feet into the ground so everything moves in a coordinated fashion.

How to do a barbell back squat

Ryan Kohler  02:38

We’re here for our barbell back squat. We’re looking here this week at two to three sets and eight to 10 reps, here’s the setup. We’ve got our barbell here on the rack, we’re going to come in and I like to try to find this little knurling here on the bar where there’s a smooth area, and I usually put my index or middle finger right around there. Then what I’m going to do is step under the bar, place it right around the meaty part of my shoulders, what I want to avoid doing is getting it right on the spine, because you’ll feel that and you’ll know it’s in the wrong spot.

Then we’ll come under it, and we’ll step up with the bar, take a step or two back, and then we’ll start to find our foot position. For this you can kind of make the foot position, whatever you want it to be, you might be a little bit more specific and say, “Hey, I want to mimic a cycling stance,” for example. Or you can get a little bit wider, let the toes turnout. It’s really up to you and kind of individual how you want to approach this part of it.

But from here, we start upright, and what we’re going to do is first move back with the hips. The hips begin the movement back as we hinge them and we start to lower ourselves down to a comfortable position. Then once we get there, we just return back up leading with the hips again.

Common mistakes when doing barbell back squats

Ryan Kohler  03:47

One common mistake I’ll see people make is that they’ll start moving with the knees. They’ll be here, but then they’ll go like this, and bend the knees first. Notice my hips haven’t moved. To correct that, always make sure you stick your butt back as if you’re trying to reach back for a chair that’s just a little bit too far. That’ll ensure you’re in a good position.

Another common mistake is wanting to look up as you descend. We’ll see some folks where they go down, but they want to keep that head up. They started going to looking up toward the ceiling. To avoid that, tuck that chin in, and just let your head travel down with the bar, and then right back up to the top.

Alternative exercises

Ryan Kohler  04:26

One alternative if you find that the bar is either too heavy, or it’s just too uncomfortable, is that you can take two dumbbells, set them up here on your shoulder level, and then go through the same motion down and back up like that.

Rowing with good form

Ryan Kohler  04:44

Next we have our row. There’s a lot of ways you can do this, I’m going to do it today with a band and standing. But if you have access to a seated row machine at the gym, you can do that. Or if you have access to a bench you can do a bent over row where you pull weight up. For this one, we’re going to look at two to three sets of eight to 10 reps. To set up here, I’m going to take my band, wrap it around the squat rack here. Again, you can do this standing or seated.

I like this because as cyclists or runners, we tend to have this hunched over posture. This allows us to work on a nice, tall athletic posture. We’re going to start here, get our hands in this rowing position, find a good amount of tension. Then we’re going to set our shoulder blades down and back and just draw the weight back. Then bring it back to the bottom here, like that. Out back here, and what we want to think about is pulling from the elbows, so not so much just pulling from the arms, but imagine that the weight is attached here and not here. You’re going to draw those elbows down and back, and then come back nice and slow to return to the bottom.

How to side plank

Ryan Kohler  05:48

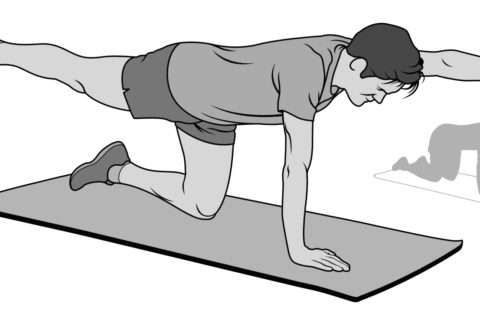
Okay, now we have our side plank, this is going to be one of our core stability exercises. To start this, we will go and place one arm down on the mat here with our shoulders just above the elbows. Then we’ll step ourselves into a nice long plank position on our side, we’ll hold this for 30 to 60 seconds, and do two to three sets total.

Ways to adjust the side plank

Ryan Kohler  06:08

If you’re newer at this and you’d like to start easier, what you can do is go down to your knees here and just bend them over here. That way you have a shorter platform that you’re working with. Finally, if you want to make this more difficult, you can go back to the starting position, go here and then add hip abduction to it, just like that. We’ll do that on both sides to three sets, 30 to 60 seconds holds per set. Alright, that’ll do it for this week. Hopefully you learned some new movements that you can work into your routine. We’ll see you next time!